The examples show the mostly used welding methods for railway welds.


|
Standard Surfacing Methods |
|
|
General The examples show the mostly used welding methods for railway welds. |
|
|
|
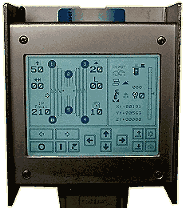
The working area is placed to go between the first and the last point, welding direction
occurs by setting of point 2. The unit can work to direction of positive or negative co-ordinates. Teach-In points will be used for adjustment of gun-positioning along the line, to ease the mounting of drive rail. Wedge-shape start- and stop-seqences provide for best connection, with less material tension. |
 |
Wear Down At deep wear down at edges, one or more filling layers are needed. All needed points for complete weld will be set like accustomed. After cleaning and preheating, the unit can be positioned above the beginning of the deepest wear down. Start-, Stop-position and movement amplitude can be adjusted as needed, to work out all filling layers. |
|
To get a quick continuation of work, for filling layers the next program can be used.
All parameters for the complete surface need not to be changed and every layer can be started very fast. The working temperature should be as constant as possible, if the rail becomes too cold, further pre-heating is needed. |
 |
 |
After filling the edge, the surface looks nearly flat. Small rolls at
beginning and end, will be planed from
following complete layer. |
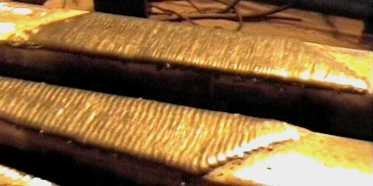 |
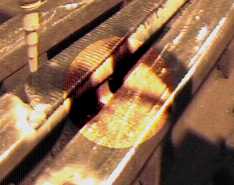
To have easy grinding work, welding parameters for the last layer can be adjusted to fine movement. However the surface should show a small fishbone pattern, otherwise welding energy was too high and material tends to flow. |
|
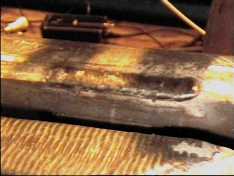
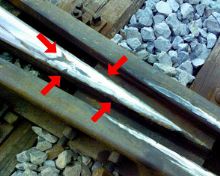
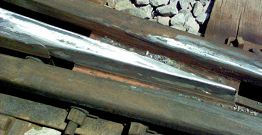
Welding Time (Highest quality, even after poor manual surfacing.) This rail has been repaired by hand and shows the typical wear down. Because the welder wasn't able to surface the complete top of rail in a proper, flat way, there are a lot of small errors at the edges and a big valley at the center of rail. |
|
The preparation of such rails will need about
30 minutes for grinding and cleaning.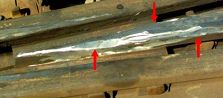
|
| After preparation, both sides needs to be filled with small layers. This is only to get a solid base for the following complete layers and has to be repeated as much as needed. In that case we needed about 8 Minutes, including the short cleaning after every weld. |
 |
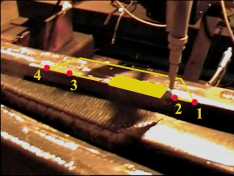
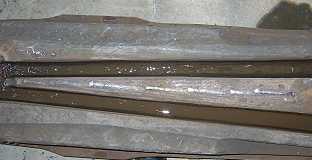
This picture shows the completely welded surface.
If, between point1 and point 2, more material is needed, additional layers can be welded first. In this case, we made a filling layer from point 1 to close to point 2. The welding time depends on wire feeder and other welding parameters. For the filling layer, we needed about 3 minutes (with cleaning). The last layer can be started directly, no additional adjustment is needed. The welding time, with middle speeds, for this piece of 610 mm was about 7 minutes. The thickness was 3.5 mm. Because of the constantly flat surface, the following work of grinding and cleaning can be done very fast. Only a small grinding machine is needed. |
|
Complete time summary: 30 minutes preparation and grinding. 20 minutes pre heating. 8 minutes filling of the edges. 3 minutes half layer filling. 7 minutes last layer. 10 minutes grinding. 78 minutes for the complete work. |
|
|
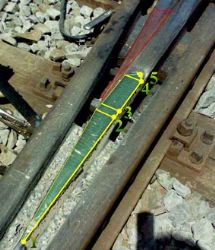
Welding Example: Manganese Welder At hard facing with manganese wire, fast layers with small amplitudes are needed. If the welding gets too hot, dwell times are needed, to get a cold work piece. To save time, all needed welding areas can be set by Teach-In points and the unit changes from one area to the next, after every layer. The form of every area can be different as needed and will be set by up to 6 Teach-In points. The unit calculates the positioning and filling of all welding areas automatically. The welding parameters can be adjusted at up to 20 separate programs, which will be memorized permanently. This example shows a multi area welding with 4 programs. The main welding line is always between point 1 and 2, which fixes the drive direction and the start position of every area. |
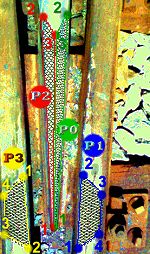 |
To get both top corners of the main frog part in high quality,
it's welded with two separate programs P0 and P2.
|
|
Automatic In-Situ Reconditioning of CMS Crossings and Rails Three programs (P0-P2) with 4 work areas and optimised helper functions for safe and fast repair of rail.
|
 |